A heat exchanger rarely fails without warning. A rising pressure drop, uneven outlet temperature, or thin layer of sludge often appears first. Ignoring these signs can increase energy use, shorten equipment life, and force an expensive shutdown. That is why practical Heat Exchanger Maintenance deserves more attention than occasional cleaning.
Heinz P. Bloch, a respected machinery reliability authority, captures the risk clearly: “The true cost of maintenance is the cost of not maintaining.” His statement applies directly to heat exchangers. A small leak between circuits may contaminate a process stream. Hard deposits can reduce heat transfer across only a few millimeters of tube surface. Regular inspection, controlled cleaning, leak testing, and accurate performance records help teams find these problems earlier.
This guide presents seven cost-focused maintenance tips for industrial heat exchangers. It considers shell-and-tube, plate-and-frame, and air-cooled designs. Each recommendation connects maintenance work with measurable results, such as lower pumping demand, steadier production, and fewer emergency repairs. However, no checklist is perfect. Water chemistry changes. Operating loads fluctuate. A cleaning method that works well in one plant may damage another exchanger.
The best decisions come from equipment history, manufacturer guidance, and field inspection. Look closely. Record everything. A technician’s observation beside a discolored gasket may reveal more than a spreadsheet. These seven tips will help maintenance teams reduce avoidable costs while protecting safety, reliability, and long-term heat-transfer performance.
Effective heat exchanger maintenance begins with measured operating data. Record inlet and outlet temperatures, pressure drop, flow rate, and energy use weekly. These readings reveal fouling before production losses become expensive. Keep the log consistent. Small gaps can distort decisions.
Record inlet and outlet temperatures, pressure drop, flow rate, and energy use weekly.
Inspect tube sheets, plates, gaskets, seals, and connections during planned shutdowns. Look for leaks, corrosion, vibration, and unusual discoloration. Clean according to the deposit type, not a fixed calendar. Over-cleaning wastes labor and may damage surfaces. Water treatment also matters, especially where scaling develops quickly. Check strainers and filters regularly. Replace damaged seals with verified specifications. Tighten fasteners using the correct sequence and torque.
A practical cost plan compares cleaning costs with lost efficiency and unplanned downtime. Keep critical spare parts available, but avoid storing every possible component. That balance is harder than it sounds. Trend pressure drop after each service to confirm improvement. If performance does not recover, investigate flow distribution, air pockets, or internal damage.
Never treat a low-cost shortcut as maintenance. I have seen teams delay inspections because the exchanger still looked clean. Appearance is unreliable.
A qualified technician should review abnormal readings and confirm safe isolation before work begins.
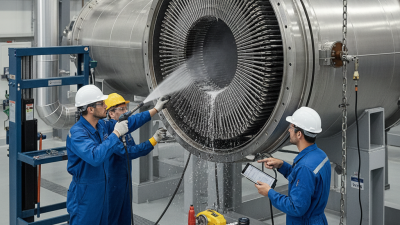
7 Best Heat Exchanger Maintenance Tips to Cut Costs?
Inspecting heat exchanger components early can prevent expensive shutdowns. A small temperature drift may signal fouling, blockage, or reduced flow. Record inlet and outlet temperatures during normal operation. Compare them with previous readings, not just design values. Unusual pressure loss deserves attention. It often indicates deposits inside tubes or channels.
Inspect tube sheets, gaskets, covers, and connection points for stains, corrosion, or dampness. A flashlight can reveal fine leaks around flange edges. Check vibration near supports and nearby piping. Loose supports may create fatigue damage over time. During cleaning, inspect removed deposits and note their color, thickness, and texture. These details can identify process changes or water treatment problems.
Use calibrated temperature and pressure instruments. Inaccurate readings can create false confidence. I have seen inspections focus on tubes while ignoring damaged gaskets. That mistake delayed the real repair. Inspect tubes with suitable visual or non-destructive methods when leakage is suspected. Examine fouling patterns instead of cleaning blindly. Keep dated photographs and measurement records for each inspection. Short records are useful. Review trends with operations staff before returning equipment to service. Always follow isolation, depressurization, and site safety procedures.
The chart shows practical screening triggers for comparing current heat exchanger performance with a clean or commissioned baseline. These normalized values help maintenance teams identify fouling, flow restriction, vibration, wall loss, and leakage risks before they cause major downtime.
Screening triggers are indicative engineering values, not universal acceptance limits. Always verify them against the equipment design basis, operating conditions, and applicable inspection standards.
Heat exchanger fouling quietly increases energy use and pressure drop. The U.S. Department of Energy’s Industrial Decarbonization Roadmap (2022) reports that process heating uses about 51% of energy in U.S. manufacturing. Clean surfaces can therefore protect both output and operating costs. However, aggressive cleaning may damage tubes, plates, coatings, or gaskets.
Tip 1: Record inlet temperature, outlet temperature, flow, and pressure before cleaning. Tip 2: Isolate, drain, and cool the exchanger fully. Tip 3: Start with low-pressure water and soft nylon brushes. Tip 4: Never use wire tools on thin plates. Tip 5: Confirm chemical compatibility with the metallurgy and gasket material. Tip 6: Keep cleaning pressure below the equipment manufacturer’s limit. Tip 7: Rinse until the discharge water reaches a neutral pH.
The International Energy Agency’s Energy Efficiency 2023 report identifies industry as responsible for roughly 37% of global final energy demand. That makes small thermal losses worth tracking. A practical inspection should compare the cleaned unit with its original approach temperature and pressure drop. A sudden improvement may reveal fouling. No improvement may indicate flow imbalance, sensor error, or internal damage.
Use a flashlight on open channels. Look for dark deposits, pitting, and bent fins. Chemical cleaning can save labor, but it is not automatically safer. Test a small deposit sample first. This step is easy to skip, and that is where mistakes often begin. Document photographs, cleaning time, chemicals, and final readings for the next maintenance cycle.
| No. | Maintenance Tip | What to Monitor or Do | Recommended Practice | Damage-Prevention Control | Cost-Control Benefit |
|---|---|---|---|---|---|
| 1 | Record baseline performance | Track inlet and outlet temperatures, flow rates, pressure drop, fluid properties, and operating hours. | Compare current readings with clean, stable operating data at similar load conditions. | Avoid cleaning based on a single abnormal reading; verify instruments and operating conditions first. | Helps identify fouling early and prevents unnecessary shutdowns or chemical cleaning. |
| 2 | Clean when performance indicates fouling | Watch for rising pressure drop, falling heat transfer, reduced outlet temperature, or increased approach temperature. | Set site-specific alarm limits using the exchanger design data and clean baseline. | Do not use a fixed calendar interval as the only trigger; excessive cleaning can accelerate wear and gasket degradation. | Reduces energy loss and avoids cleaning equipment that is still operating efficiently. |
| 3 | Use the least aggressive cleaning method first | Select mechanical, hydraulic, chemical, or combined cleaning according to the deposit type and exchanger construction. | Begin with flushing or soft brushing where practical; use chemical cleaning only when the deposit requires it. | Confirm compatibility with tubes, plates, coatings, elastomers, and metallurgy before applying chemicals or tools. | Limits material damage, chemical consumption, labor time, and replacement-part costs. |
| 4 | Control cleaning pressure and temperature | Verify pressure, temperature, nozzle type, flow direction, and exposure time during cleaning. | Use the exchanger manufacturer’s limits; for high-pressure water, select the lowest pressure that removes the deposit effectively. | Keep jets perpendicular or appropriately angled to the surface, and avoid concentrated spray on thin tubes, fins, or gaskets. | Prevents tube erosion, plate deformation, fin damage, gasket failure, and costly leaks. |
| 5 | Match chemicals to deposits and materials | Identify scale, biological deposits, oil, corrosion products, or suspended solids before choosing a cleaner. | Check concentration, pH, temperature, contact time, ventilation, neutralization, and waste-disposal requirements. | Never mix incompatible chemicals; test the cleaning solution on representative materials when compatibility is uncertain. | Reduces corrosion, contamination, rework, and premature exchanger replacement. |
| 6 | Flush, inspect, and dry completely | Remove residual chemicals and loosened deposits; inspect tubes, plates, channels, welds, and gaskets. | Use clean compatible rinse water until discharge conditions meet the site procedure, then drain and dry as required. | Look for pinholes, cracks, plugged passages, gasket swelling, plate deformation, and signs of corrosion before reassembly. | Catches damage before startup and prevents residual chemicals from causing accelerated corrosion. |
| 7 | Prevent fouling after cleaning | Check strainers, filters, water quality, flow velocity, dead zones, air ingress, and process contamination sources. | Maintain suitable filtration and flow conditions, repair leaks, and keep cooling or process fluids within specification. | Avoid operating below the minimum design flow where low velocity can promote sedimentation or biological growth. | Extends cleaning intervals, stabilizes heat-transfer performance, and lowers water, chemical, and labor use. |
Note: Cleaning limits must be confirmed against the exchanger design specification, material compatibility data, safety procedures, and applicable environmental requirements. Exact pressure, temperature, chemical concentration, and cleaning frequency vary by exchanger type, deposit, fluid, and construction material.
Heat exchanger maintenance becomes cheaper when operators notice small changes early. In field inspections, I check fluid flow, pressure, and temperature before opening equipment. A weaker flow may indicate fouling, trapped air, a blocked strainer, or a failing pump. Record readings at stable operating conditions. Random measurements can mislead.
Compare current flow with commissioning data and recent logs. Monitor pressure on both sides of the exchanger. A rising pressure drop often signals deposits or restriction. A falling pressure difference may suggest reduced flow or an instrument problem.
Check inlet and outlet temperatures together. A smaller temperature difference can reveal fouling, poor circulation, or an incorrect control setting. Calibrated gauges matter.
Tips: Compare current flow with commissioning data and recent logs. Monitor pressure on both sides of the exchanger. A rising pressure drop often signals deposits or restriction. A falling pressure difference may suggest reduced flow or an instrument problem. Check inlet and outlet temperatures together. A smaller temperature difference can reveal fouling, poor circulation, or an incorrect control setting. Calibrated gauges matter.
Leaks need careful attention. Look for wet insulation, stains, dripping connections, and unusual odors around seals. Some leaks remain hidden until the unit heats up. Use approved detection methods and follow site safety procedures. Never tighten a connection on pressurized equipment.
I once trusted a normal pressure reading too quickly; the sensor was inaccurate. That mistake reinforced a useful habit: verify suspicious results with a second instrument. Keep clear records of repairs, cleaning dates, pressure trends, and temperature performance. Small gaps in records can delay the right decision.
Heat exchanger maintenance is less expensive when planned before performance drops. A preventive schedule gives technicians time to inspect surfaces, seals, valves, and connections. It also reduces emergency shutdowns during peak production.
Set inspection intervals according to operating hours, fluid quality, and temperature changes. A monthly check can record pressure differences, outlet temperatures, vibration, and visible leaks. Every three to six months, inspect strainers and clean accessible surfaces. Fouling develops quietly. That is the problem.
Keep each result in a maintenance log. Compare current readings with the equipment’s normal operating range. A rising pressure drop may indicate blocked passages or heavy deposits. A falling temperature difference can suggest poor flow, scaling, or an inaccurate sensor. Qualified technicians should isolate, depressurize, and cool the unit before opening it.
Do not rely on the calendar alone. Water chemistry, suspended particles, and frequent cycling can shorten service intervals. In one common oversight, teams clean plates but ignore hardened gasket edges. The unit then leaks weeks later. Small details matter. Review the schedule after every inspection and adjust it when evidence supports a change. Replacing worn seals early usually costs less than repairing contaminated equipment or lost production. Still, preventive work is not perfect; a clean inspection can miss internal corrosion. Use trend data, visual checks, and professional testing together.